These were actually easier to fit than the instructions implied. I just did as Robbe suggested and it worked. Two issues.
The dimensions given for the scuppers seem to set them too low relative to the deck. I raised them about 1mm.
The guwale plastic profile does not match the shape of the hull. Although they fit snugly along their lower edge, there is an unsightly gap between the edge of the deck and the inner edge of the gunwales. This is impossible (for me anyway) to fill as it would inevitably muck up the edge of the planked deck. I read somewhere that someone else used silicone mastic, which seems a good idea to me but not until the painting is 100% complete.
Tuesday 9 November 2010
Monday 1 November 2010
Painting the hull
All being well, the inside of the bulwarks will be white, the upper hull black, white waterline, red under water, all gloss, after all, this is a millionaires yacht!!
I am going to follow the folowing sequence
I am going to follow the folowing sequence
- Prime all over, done
- Red below waterline, done
- White waterline, done
- Fit bulwarks using instant glue and fill screw holes
- Prime bulwarks
- Paint inside bulwarks and deck edge white
- Paint outside black
- T cut and polish
Hopefully, that will work. One problem, hull was upside down for about a week and the keel weight fell out fortunately without damage to the hull. Moral, fit weight after all the upside down stuff is complete.
Sunday 24 October 2010
The Deck completed
With a bit of an interruption due to a holiday I have now finished planking the deck-hooray!
I want to paint the hull with acrylic car sprays so thought I had better check compatibility of the deck finish. First I applied 2 sealer coats of dope which is fine then experimented with DIY shop PU varnish which isn't. I wanted a matt or satin finish to the deck so in the end used Humbrol acrylic matt varnish which looks good I think and is compatible with Halfords acrylic car sprays. The first phase of deck fittings is pretty simple.
I want to paint the hull with acrylic car sprays so thought I had better check compatibility of the deck finish. First I applied 2 sealer coats of dope which is fine then experimented with DIY shop PU varnish which isn't. I wanted a matt or satin finish to the deck so in the end used Humbrol acrylic matt varnish which looks good I think and is compatible with Halfords acrylic car sprays. The first phase of deck fittings is pretty simple.


Friday 3 September 2010
Planking the Deck
This is what is happening now.
I found an excellent item about planking and caulking options http://shipmodeling.net/vb_forum/articles51-Deck-Plank-Caulking-Mock-up.html
I have u sed thread before and achieved a great result but with much thinner planks and I am not confident about using a marker or pencil so I opted for black art paper glued to the edge of 6 planks at a time. To start with I was going to use Bostik for this but on a sample it seemed to smear and stain the plank surface when sanded. I have opted for PVA which is working great provided that the planks are separated with a scalpel after a few minutes. If left overnight they form a solid block which is very hard to separate, I KNOW!
I have stolen the idea of using darker coloured wood for the edging planks and have continued the idea across the stern. I do not like the sound of the Robbe suggestion to finish the planks flush with the stern. Perhaps they have a reason which will become apparent when I get that far.
 My only suggestion is to have a bottle of superglue remover to hand as I have found it impossible to avoid a build up on my fingers. Perhaps this has criminal potential for eliminating fingerprints?
I found an excellent item about planking and caulking options http://shipmodeling.net/vb_forum/articles51-Deck-Plank-Caulking-Mock-up.html
I have u
sed thread before and achieved a great result but with much thinner planks and I am not confident about using a marker or pencil so I opted for black art paper glued to the edge of 6 planks at a time. To start with I was going to use Bostik for this but on a sample it seemed to smear and stain the plank surface when sanded. I have opted for PVA which is working great provided that the planks are separated with a scalpel after a few minutes. If left overnight they form a solid block which is very hard to separate, I KNOW!I have stolen the idea of using darker coloured wood for the edging planks and have continued the idea across the stern. I do not like the sound of the Robbe suggestion to finish the planks flush with the stern. Perhaps they have a reason which will become apparent when I get that far.
My only suggestion is to have a bottle of superglue remover to hand as I have found it impossible to avoid a build up on my fingers. Perhaps this has criminal potential for eliminating fingerprints?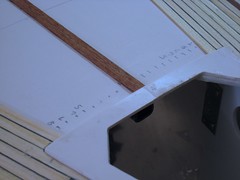
Atlantis Genoa Option
Nearly caught up to where I am now.
I still have qualms about my decision to not fit a genoa. I dont know if it is still possible at this stage and it sort of does sound like a bit of fun. I wonder what anyone else thinks or has experienced?
I still have qualms about my decision to not fit a genoa. I dont know if it is still possible at this stage and it sort of does sound like a bit of fun. I wonder what anyone else thinks or has experienced?
Starting the hull
The first steps of preparing the hull seem to be quite straightforward.
The very fir st thing I did was glue a bar around each side inside the hull packed off the side with spacers. This is so that I can cable tie the wiring to it later. Those little self adhesive pads always seem to fall off eventually and spoil a carefully executed layout.
The only change I made in the early stages was to use glass fibre tape 25mm wide to strengthen the joins as I am very aware of the stresses that will be caused by the keel weight.
The motor box does not need to be 100% watertight now that the auxilliary motor is permanent and not a retractible affair. Also most of the holes in part 3.1 are not required with the new design, unfortunately I did not think of that until I had formed them and wasted an hour searching for the captive nut 3.6 which I eventually concluded is not now required or supplied. I have however added 2 holes to the bulkhead to allow me to get at the motor mounting screws should I ever need to remove it.
I wanted to get as far as possible before fitting the weight for ease of handling but realised that if I fitted the deck beams 8.2 & 8.3 I probably would not be able to get it in. I do however strongly advise fitting and ble nding in the rudder concave strip 7.2 before fitting the keel.
I note that other builders have been concerned about the strength of the deck to support the masts and I have seen a couple of improvements that other builders have made which look good. What I thought I would do is forget this issue for now and install some styrene pillars dirctly from the deck beams to the keel when I am sure that I can position them without fouling anything later on.
The very fir
st thing I did was glue a bar around each side inside the hull packed off the side with spacers. This is so that I can cable tie the wiring to it later. Those little self adhesive pads always seem to fall off eventually and spoil a carefully executed layout.The only change I made in the early stages was to use glass fibre tape 25mm wide to strengthen the joins as I am very aware of the stresses that will be caused by the keel weight.
The motor box does not need to be 100% watertight now that the auxilliary motor is permanent and not a retractible affair. Also most of the holes in part 3.1 are not required with the new design,
unfortunately I did not think of that until I had formed them and wasted an hour searching for the captive nut 3.6 which I eventually concluded is not now required or supplied. I have however added 2 holes to the bulkhead to allow me to get at the motor mounting screws should I ever need to remove it.I wanted to get as far as possible before fitting the weight for ease of handling but realised that if I fitted the deck beams 8.2 & 8.3 I probably would not be able to get it in. I do however strongly advise fitting and ble
nding in the rudder concave strip 7.2 before fitting the keel.I note that other builders have been concerned about the strength of the deck to support the masts and I have seen a couple of improvements that other builders have made which look good. What I thought I would do is forget this issue for now and install some styrene pillars dirctly from the deck beams to the keel when I am sure that I can position them without fouling anything later on.
 So far so good.
Eventually getting round to it!
OK - been a bit tardy in getting down to this but as the build is now a little underway thought I ought to do a bit of catch up.
The delay was due to me finishing a Model Slipways kit, Drumbeat of Devon. Very happy with it although the windows were a bit of a pain.
Now on to Atlantis (what shall I call her?)
The delay was due to me finishing a Model Slipways kit, Drumbeat of Devon. Very happy with it although the windows were a bit of a pain.
Now on to Atlantis (what shall I call her?)
We are caravannners and as the vessel is a bit big to cart around I opted to start with assembly of the Dinghy, step 23 but never mind!
I read on another blog that the Robbe supplied veneer is rubbish but thought I would try to use it anyway - big mistake!
The precut pieces for the gunwales have the grain running vertically which is odd and they are also impossibl
 y fragile. Additionally, I can't see the point of gluing veneer to thin ply for the thwarts, what can be done with the edges?
A visit to the excellent Ipswich model shop (Galaxy Models) provided some thin stripwood for the gunwales and some sheet for the thwarts and bouyancy boxes in the bow and stern. By the way, Robbe term these bouyancy boxes but don't fill them in so I filled them in anyway. I am happy with the way this little project turned out but I still have problems trying to paint a perfect waterline, I used Trimline tape on "Drumbeat" but it is
 starting to separate. I must get this right before I have to paint the Atlantis hull.
Subscribe to:
Posts (Atom)
